
How to teach your dog to wear a buster collar (cone)

Photo by Tatiana Rodriguez on Unsplash
Putting head through buster collar used for recovery (also known as a cone)
Many dogs need medical procedures at least once in their lifetime. When there are stitches, they need to use a buster collar (a cone) to keep the wound safe for healing. It’s very common to see the dog not wanting to wear the buster collar. They refuse to walk, they tense up, they keep scratching the collar, they can’t sleep or they give you this look that many of us would interpret as saying “take this thing off of me!”
It doesn’t have to stay this way. We can teach dogs to get into the buster collar (cone) like a trick. How this teaching process will go can vary. It depends on a dog, how much success he had previously in learning using treats, how much experience did his caregiver have in this type of teaching, dogs’ medical history, environment and many more. There is no one recipe that fits them all. Here is an example of one of the recipes.
Preparation
It's good to start training without the necessity of the cone. We want to make it fun and exciting. The more fun the dog has and the more positive consequences he receives, the faster the progress will be. It’s about making positive associations with it, a lot of fun and tasty treats. Never forcing it on the dog is the key, otherwise, a dog might get scared and the process will take a lot longer. It’s important to allow the dog to learn at his own pace and take a step back if necessary. We want to teach it by systematically adding steps towards the end behaviour which is putting head through a buster collar and staying calm while wearing it. It doesn’t matter how long it takes as long as both of you enjoy the process.
1. Get a buster collar and make it as wide as possible.
It’s best to start the process with a wide cone, that will make it easy for the dog to put his head through. Adjusting it on him will come later.
2. Use his food if he loves it or his favourite treats but then make sure to give him less dinner.
For the process of teaching, you can use his dinner if your dog loves it or his favourite treats but make sure to remove some of his dinner as there will be plenty of treats needed. Some steps can take a lot of repetition. That’s why it’s great to use your dog's dinner or breakfast for this process or take some of his food out if you are using treats. We are not trying to make your dog put on unnecessary weight.

Photo by Sebastian Coman Travel on Unsplash
3. Do many short sessions (as short as 3 minutes or time needed for water to boil in the kettle).
It’s often better to start from many short sessions (even just up to 3 minutes) rather than one long one. Putting a kettle on and waiting for the water to boil is the perfect time for a training session. Keep the sessions short and come back to it the next day if you feel like you’ve already used enough treats for the day.
Learning process takes time and sometimes taking a break is a great way for all those new memories to sink in!
4. Find a quiet, safe space in your house.
Arrange the environment for your dog so he feels safe. Find a quiet spot in your house. It can be your kitchen when you put the kettle on.
5. Have his water bowl nearby.
Make sure to keep his water bowl close by. When feeding a lot of treats or food, he might get thirsty soon.
6. Have his bed or blanket nearby where he can go for safety.
Make sure he has a place to go to, where he feels safe. For many dogs, it’s his bed or mat.
7. Put the rest of his food down onto his mat or bed after the training session.
We want to make this training session fun and worth coming back to. Finishing the training doesn’t have to be bad either. If you put the rest of his food on his mat, he can finish eating while you disengage with him. Give him something else to do, so you can easily walk away from the session.
8. Enjoy the process, not just the end destination
Have fun training with your dog and spending time with him, no matter how much progress you are currently making.
Training
1. Dog looks at the cone
The first step is to just show the collar in a distance and feed the treat when the dog just looks at it. Make sure he actually sees it, we are not trying to trick him into wearing it! We want to teach him to enjoy putting it on. Feed the treat away from the cone so he has to look at it again and you have the time to hide it behind your back. Repeat at least 4-5 times before moving on to the next step.
When he doesn’t look at the cone, try shaking it to attract attention. You can repeat the shaking 2-3 times but try keeping it still next time and see if he looks at it anyway.

2. Dog moves towards the cone
Next step is feeding the treat when the dog moves towards the collar. Don’t expect too much prematurely. It’s better to go slowly and methodologically rather than push too fast too soon. If your dog is not taking steps towards the cone, hide it for a second and next time be ready to give a treat just for looking at it. It’s ok to move back a step and continue what you’ve been doing at step 1. We want to make the whole process fun. When you get frustrated that your dog is not moving towards it, it stops being fun for both of you. You can always finish this session sooner and try again next time. You might be surprised to see that next time your dog starts moving towards it immediately.
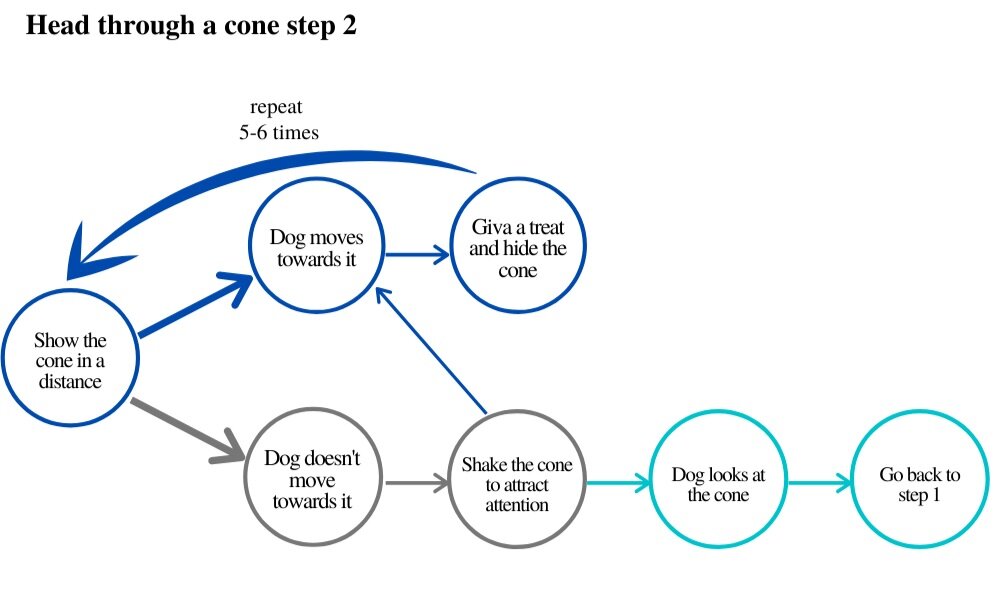
3. Dog puts his muzzle through the cone
Next step for your dog will be to put the muzzle through. At this stage, you continue to keep the cone firmly in your hand. Feed the treat away from the cone so he continues to put his muzzle through. Hide the cone and show it again to see if he repeats the behaviour. If he doesn’t, don’t be afraid to go back a step or even two steps. There are many things that affect learning. He can have upset stomach or he might have got scared of something early in the day and feels agitated and can’t concentrate. Remember, keeping it fun and exciting is your goal, not the end behaviour.

4. Dog puts head through when you keep the cone still
Next step for your dog is to put the head through. At this stage, you continue to keep the cone firmly in your hand. Feed 3 treats (or so) when he has his head through and allow him to move back from it at any time! If the dog is refusing to put his head through, don’t be afraid to move back a step and continue to treat every step towards it. It’s ok if it takes time.
When your dog moves away from the cone in your hand, it can be a sign he is no longer comfortable with the process. You might feel an urge to call him back to you. I would encourage you to not do that. It’s ok for him to say “no, thank you”. Take back a step and try something easier again. You can climb up the ladder on the next session if the need will be. Allowing your dog to say “no” creates trust. He will be more likely to enjoy the next sessions if you do. Next time, you will be more likely to ask for more without any moving away.
Repeat the process until you see the whole head through and he is reliably going in and out of the cone. Don’t let go of it just yet. We are working on going in and out first, the duration comes second.

5. Dog puts head through and you let go of the cone
Next step is to let go of the cone while it’s on your dog’s neck but make sure to be right next to him if he shows any signs of discomfort and wants to get out of it. Allow him to get out of it and take it off. The more choice he has to move away from it and is not forced to wear it, the more likely he will be next time to continue the process for longer.
After training, you get a dog that as soon as you get the buster collar out, he runs towards it and puts his head through! Now that’s a party trick right there!

6. Dog stays calmly with the cone on his neck
The last stage is adding duration for the dog wearing the buster collar calmly. Just like with previous steps, we will be increasing duration gradually. I wouldn’t just leave it on him straight away as he then can get scared of it and refuse to get back to it the next time you show it. Just 1 second is a good start. Depending on a dog it can be longer. Adding seconds also depends on the dogs’ behaviour. If by any point you see him agitated or irritated to have it on his neck, allow him to get out of it.
I would advise to not add time in a linear manner but rather be as unpredictable as you can. When your dog is staying calmly for 3 seconds, you can alternate and next time give him a treat immediately, then wait 5 s, then 2 seconds and so on. This way gives you the best chance to build his calm behaviour as he can’t predict how long he will wait for the treat next time.
At the flowchart, you can see “Give a treat after x seconds”. We want to make it as random as possible, so the x will vary every time. It also depends on the dog how long he will stay calmly, sometimes it can be 10 seconds straight away and some dogs will struggle with just 1 second of waiting. You will have to assess for yourself what works for your dog.

Last few words
I understand that this process might not be for everybody. It might seem daunting to many of you and it’s ok. The process can be much faster than that, it widely varies between dogs. Sometimes you can speed up the process with a use of luring but it’s not always advisable. Breaking the behaviour down is the most reliable process that will keep the behaviour solid for the rest of your dogs’ life. The important thing that can help you is to notice all the small changes. It’s great to keep a record! Video the training so you can assess the progress you make. Think of it as a valuable time you spend with your dog and not as a way to get to your end goal. It’s about enjoying the journey, not about getting to the end destination.
Disclaimer: Every situation is different and this advice won’t be for every single dog owner. Some dogs don’t even like treats. There is a protocol to change that and teach them to enjoy treats but it is beyond the scope of this blog.
You can use a clicker or a verbal marker if you know how to do it. It will be beneficial for the dog to get the exact point of what we are asking him to do but not every caregiver needs to want to learn this skill. I want this blog to be as open as it can be. It’s not about perfection from any side. It’s about moving forward in the right direction. More advanced training is beyond its scope. At least for now.
Be a Superhero for your dog, he will love you for it!

Photo by Zachary Casler on Unsplash


I'm feeling great and I prioritise health. I don't feel better than anyone else! I can enjoy feeling good about myself and hope for everyone else to enjoy themselves too. I believe that happiness is not something you achieve, it's something you DO. I'm choosing habits for happiness and I do them every day. I hope you can join me and start to seek happiness every day.